Mastering GraphQL in React Native: A Step-by-Step Guide with TypeScript and Redux Toolkit
Introduction
When building modern applications, developers often need to choose between different methods for client-server communication. REST (Representational State Transfer) has been the traditional approach, where each resource is accessed via a specific endpoint. However, REST can sometimes lead to inefficiencies like over-fetching (retrieving more data than needed) or under-fetching (not retrieving enough data, requiring additional requests).
GraphQL is a modern alternative that addresses these issues by allowing clients to request exactly the data they need in a single query. Developed by Facebook in 2012 and open-sourced in 2015, GraphQL has become a popular choice for developers who want more control over data retrieval.
What is GraphQL?
GraphQL is a query language for APIs that enables clients to define the structure of the response. Unlike REST, where the server dictates the shape of the data, GraphQL allows the client to specify what data is needed. This approach offers several advantages:
Precise data fetching: Clients can request only the data they need.
Single request: Multiple resources can be fetched in a single request.
Strong typing: GraphQL uses a type system to define the structure of the API, providing better tooling and error handling.
Setting Up GraphQL in a React Native App
Let’s walk through the process of setting up GraphQL in a React Native app with TypeScript. We’ll create an app that displays properties for a specific user, using a custom useProperty hook to fetch data based on the user ID passed through the app’s routes.
Step 1: Setting Up a GraphQL Server
Before diving into the React Native implementation, you’ll need a GraphQL server. This server will expose a properties query that returns property data. If you don't have one set up, consider using a service like Apollo Server or Hasura.
Step 2: Installing Required Libraries
Install the necessary libraries in your React Native project:
npm install @apollo/client graphql
@apollo/client: A comprehensive state management library for working with GraphQL.
graphql: The core GraphQL library for parsing and executing queries.
Step 3: Configuring Apollo Client
In your project, set up Apollo Client to manage the connection to your GraphQL server. Wrap your application in an ApolloProvider to make the client available throughout your app.
import React from 'react';
import { ApolloClient, InMemoryCache, ApolloProvider } from '@apollo/client';
import App from './App';
// Initialize Apollo Client with your GraphQL endpoint
const client = new ApolloClient({
uri: 'https://your-graphql-endpoint.com/graphql',
cache: new InMemoryCache(),
});
const Main: React.FC = () => {
return (
<ApolloProvider client={client}>
<App />
</ApolloProvider>
);
};
export default Main;
Step 4: Creating the useProperty Hook
The useProperty hook will fetch properties based on the user ID. We’ll use Apollo Client’s useQuery hook for this.
import { useQuery, gql } from '@apollo/client';
// Define the GraphQL query with a user ID variable
const GET_PROPERTIES = gql`
query GetProperties($userId: ID!) {
properties(userId: $userId) {
id
title
description
price
location
}
}
`;
// Define the shape of the property data
interface Property {
id: string;
title: string;
description: string;
price: number;
location: string;
}
// Define the expected response from the GraphQL query
interface GetPropertiesResponse {
properties: Property[];
}
// Define the expected variables for the query
interface GetPropertiesVariables {
userId: string;
}
// Create the custom hook to fetch properties based on user ID
export const useProperty = (userId: string) => {
const { loading, error, data } = useQuery<GetPropertiesResponse, GetPropertiesVariables>(
GET_PROPERTIES,
{
variables: { userId },
}
);
return {
loading,
error,
properties: data ? data.properties : [],
};
};
This hook encapsulates the logic for querying properties by user ID, making it reusable across your app.
Step 5: Displaying Properties in a List
Next, create a component to display the list of properties using the PropertyItem component and integrate Redux Toolkit for state management.
import React from 'react';
import { FlashList } from '@shopify/flash-list';
import { useSelector } from 'react-redux';
import { useProperty } from './hooks/useProperty';
import PropertyItem from './components/PropertyItem';
import LoadingComponent from './components/LoadingComponent';
import ErrorHandler from './components/ErrorHandler';
// Define the shape of the Redux state for saved properties
interface RootState {
properties: {
saved: string[];
};
}
// Define the component props to accept userId
interface PropertyListProps {
userId: string;
}
const PropertyList: React.FC<PropertyListProps> = ({ userId }) => {
const { loading, error, properties } = useProperty(userId);
const savedProperties = useSelector((state: RootState) => state.properties.saved);
// Show a loading component while the data is being fetched
if (loading) return <LoadingComponent />;
// Show an error handler if there was an issue fetching data
if (error) return <ErrorHandler error={error} />;
return (
<FlashList
data={properties}
keyExtractor={(item) => item.id}
renderItem={({ item }) => (
<PropertyItem property={item} isSaved={savedProperties.includes(item.id)} />
)}
/>
);
};
export default PropertyList;
In this component:
The useProperty hook fetches properties based on the userId.
Loading and error states are handled with LoadingComponent and ErrorHandler.
The FlashList component renders the list of properties efficiently.
Step 6: Integrating with Redux Toolkit
Use Redux Toolkit to manage the global state, such as saved properties, across your application.
import { configureStore, createSlice, PayloadAction } from '@reduxjs/toolkit';
// Define the initial state of the properties slice
interface PropertiesState {
saved: string[];
}
const initialState: PropertiesState = {
saved: [],
};
// Create a slice for properties management
const propertiesSlice = createSlice({
name: 'properties',
initialState,
reducers: {
// Action to save a property by ID
saveProperty: (state, action: PayloadAction<string>) => {
state.saved.push(action.payload);
},
// Action to unsave a property by ID
unsaveProperty: (state, action: PayloadAction<string>) => {
state.saved = state.saved.filter(id => id !== action.payload);
},
},
});
// Export actions for use in components
export const { saveProperty, unsaveProperty } = propertiesSlice.actions;
// Configure the Redux store with the properties slice
const store = configureStore({
reducer: {
properties: propertiesSlice.reducer,
},
});
export default store;
App imlementation
On this way, we already fixed our state redux. to use it, we need first to include the React native redux store provider into our app.
// App.tsx
import React from 'react';
import { Provider } from 'react-redux';
import store from './redux';
import PropertiesScreen from './screens/PropertiesScreen';
const App = () => (
<Provider store={store}>
<PropertiesScreen />
</Provider>
);
export default App;
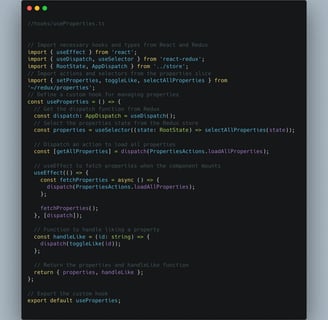
and now we need to include all of this into the properties screen.
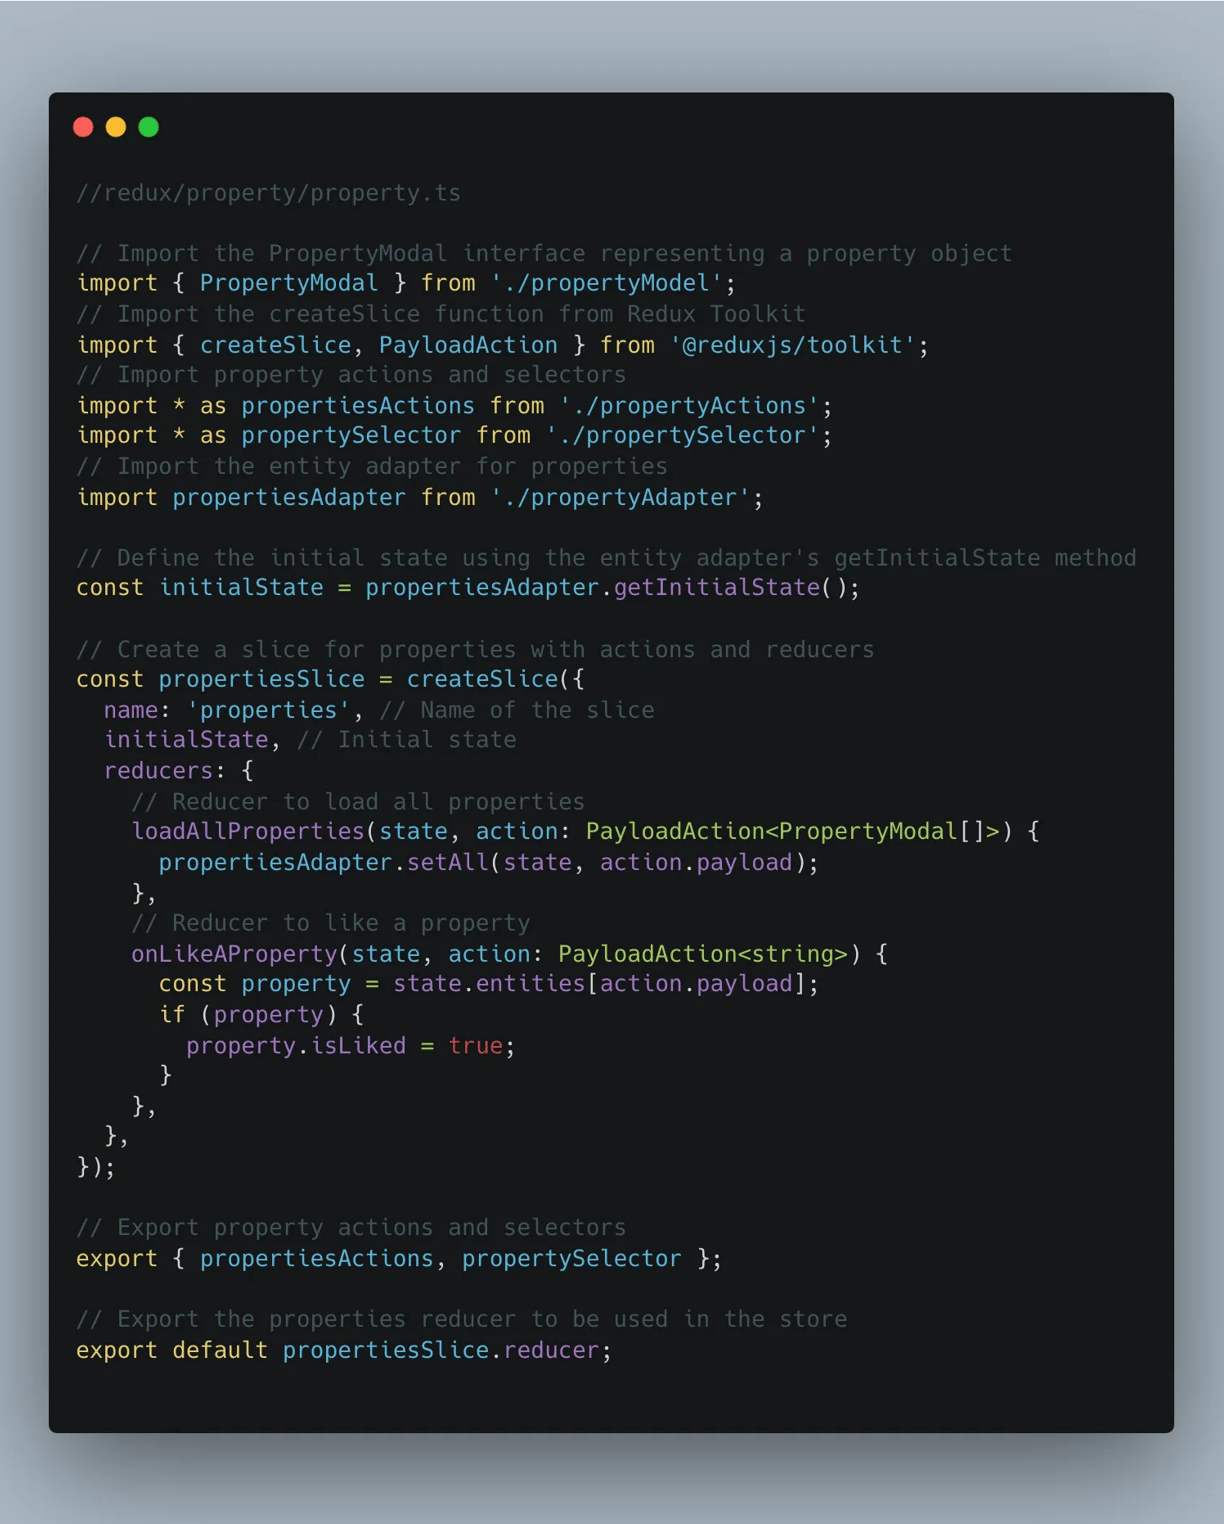
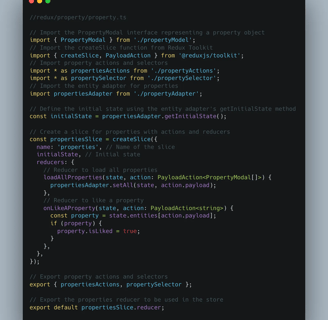
Create you Redux hook
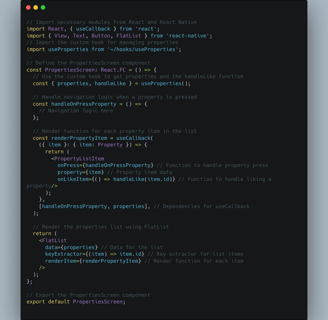
the best way to do it, is to exctract the hook responsible for getting data, and for liking first, and include it:

Conclusion
In this comprehensive guide, we’ve explored the power of Redux Toolkit and its role in crafting well-structured and scalable React Native applications. You’ve learned:
The fundamentals of Redux Toolkit, its benefits, and how it simplifies Redux development.
A step-by-step approach to setting up Redux Toolkit in your app.
The Facade Design Pattern and its value in separating data fetching logic from your components.
How to implement Redux slices, actions, entity adapters, and selectors for efficient state management.
Strategies for building an offline-capable app, including API call caching.
The creation of a custom hook to streamline Redux integration with your components, leading to better app structure and maintainability.
By effectively utilizing Redux Toolkit’s capabilities, you’ve equipped yourself to build React Native applications that are well-organized, easier to maintain, and can handle complexities with greater ease. As your app grows, Redux Toolkit can provide a solid foundation to ensure its continued scalability and performance.
With Redux Toolkit, you can easily manage the state of saved properties and extend the functionality as needed.
If you need to integrate Advanced functionalities in your Mobile app, create one from scratch, or need consulting in react native. Visit the casainnov.com, and check their mobile app page, and contact them there
We have more tutorials and articles in our blog.
More blog article here:
Innovation, tech and entrepreneurship
We help you launch your Ai startup
© 2024. All rights reserved.
Prefer to reach out directly, send us an email at :
Sales@casainnov.com
Location
Germany, Berlin