How to use Redux Toolkit for your React and React Native app
Introduction
I talked in a previous article about the State management in React and React Native app. in this article I will go deep into the tech implementation of Redux Toolkit for your react native app.
In this article, i will do the following
You will learn what is redux toolkit and its usage
will take you step by step into how to setup Redux toolkit for your app
how to usage the Facade Design pattern with Redux toolkit
How to scale your app, and have a better abstraction of the work going into your app
How to implement a redux slice, redux actions, using entity adapter and selectors to pass data
How to have an offline app, and cache api calls
How to use a custom hook to integrate redux hook into you app, and have a better app structure.
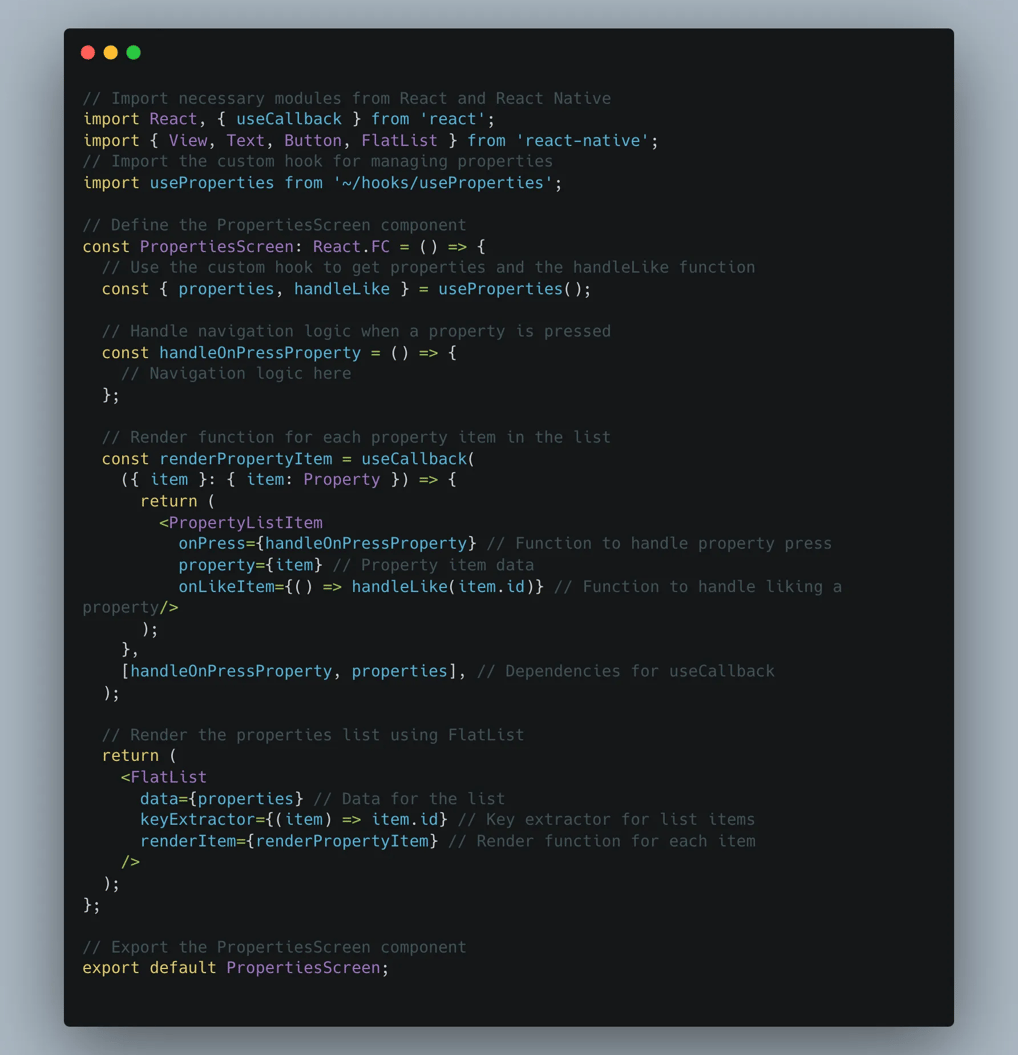
a simple example of integration with a screen.
What is Redux Toolkit
The Redux Toolkit package is intended to be the standard way to write Redux logic. It was originally created to help address three common concerns about Redux:
“Configuring a Redux store is too complicated”
“I have to add a lot of packages to get Redux to do anything useful”
“Redux requires too much boilerplate code”
We can’t solve every use case but in the spirit of create-react-app, we can try to provide some tools that abstract over the setup process and handle the most common use cases, as well as include some useful utilities that will let the user simplify their application code.
Redux Toolkit also includes a powerful data fetching and caching capability that we’ve dubbed “RTK Query”. It’s included in the package as a separate set of entry points. It’s optional but can eliminate the need to hand-write data-fetching logic yourself.
How to implement Redux Toolkit
Let’s say we have an app for real estate agencies. in the app, we pass property listing into all the apps, the user can like or dislike a property and get more details about it. The idea to use
Installation
To start using the Redux toolkit for your state management
npm install @reduxjs/toolkit react-redux
check the official website for more details
Patterns to take into account when using Redux Toolkit
When using the Redux toolkit, we need to take into account different patterns to help us scale the app, have a clean code, and be able to debug easily. I talked more about Patterns in React and React native here.
The Facade Pattern:
link to an article that I wrote about it here
To implement the Facade pattern, we will do the following: as our API calls pass by an API fetch provider. In this example, we use Axios.
First: Create a folder named API.
In this file, we will put all the API calls, API routes, API interceptor…
For example:
api/Api.ts
import axios from 'axios';
import AxiosErrorHandler from '@utils' // create your own api handler
const API_PROPERTY='www.apilink.com/properties'
// we define our axios Error handler.
axios.interceptors.response.use((response) => response, AxiosErrorHandler);
axios.defaults.headers.common.accept = 'application/json';
// we use propertiesApiAxios for managing Properties api calls
export const propertiesApiAxios = axios.create({
baseURL: API_PROPERTY,
});
Second: Create a folder named PropertyAPI.
create a folder named PropertyAPI, with different API calls files.
Third: Define your routes.
create a file route.ts, to put all the routes of the API calls that is in the property.
//api/propertyApi/routes.ts
export const ROUTE_GET_ALL_PROPERTIES = '/all';
export const ROUTE_LIKE_PROPERTIES = '/like';
export const ROUTE_DISLIKE_PROPERTIES = '/dislike';
With that we can change the route easily if we upgrade the version from the backend, or if we change the calls with just a small change
in the folder, create a class called propertyApi.ts, which includes the calls to get all properties, and add and delete from the liked list. ( basically
//api/propertyApi/PropertyApi.ts
import { propertiesApiAxios } from '../Api';
import { ROUTE_GET_ALL_PROPERTIES,ROUTE_LIKE_PROPERTIES ,ROUTE_DISLIKE_PROPERTIES} from './routes';
import {GetAllPropertiesResponse, LikePropertyPayload,LikePropertyRespone} from '../types'
class PropertyApi {
/*get the list of the properties /
loadAllProperties() {
// We do Api call here
return propertiesApiAxios.get<GetAllPropertiesResponse>(ROUTE_GET_ALL_PROPERTIES);
}
/ like a property */
likeAPropety({propertyId}:LikePropertyPayload){
return propertiesApiAxios.post<LikePropertyRespone>
(ROUTE_LIKE_PROPERTIES
+propertyId);
}
}
export default new PropertyApi();
How can Facade approach help us to scale:
And now the facade is implemented, it will help us to scale in different scenario:
1- if the API request address changed, we can update that easility.
2- if we want to change the library for API calls.
3- we can check the API calls debugging easility, by using an interecepter.
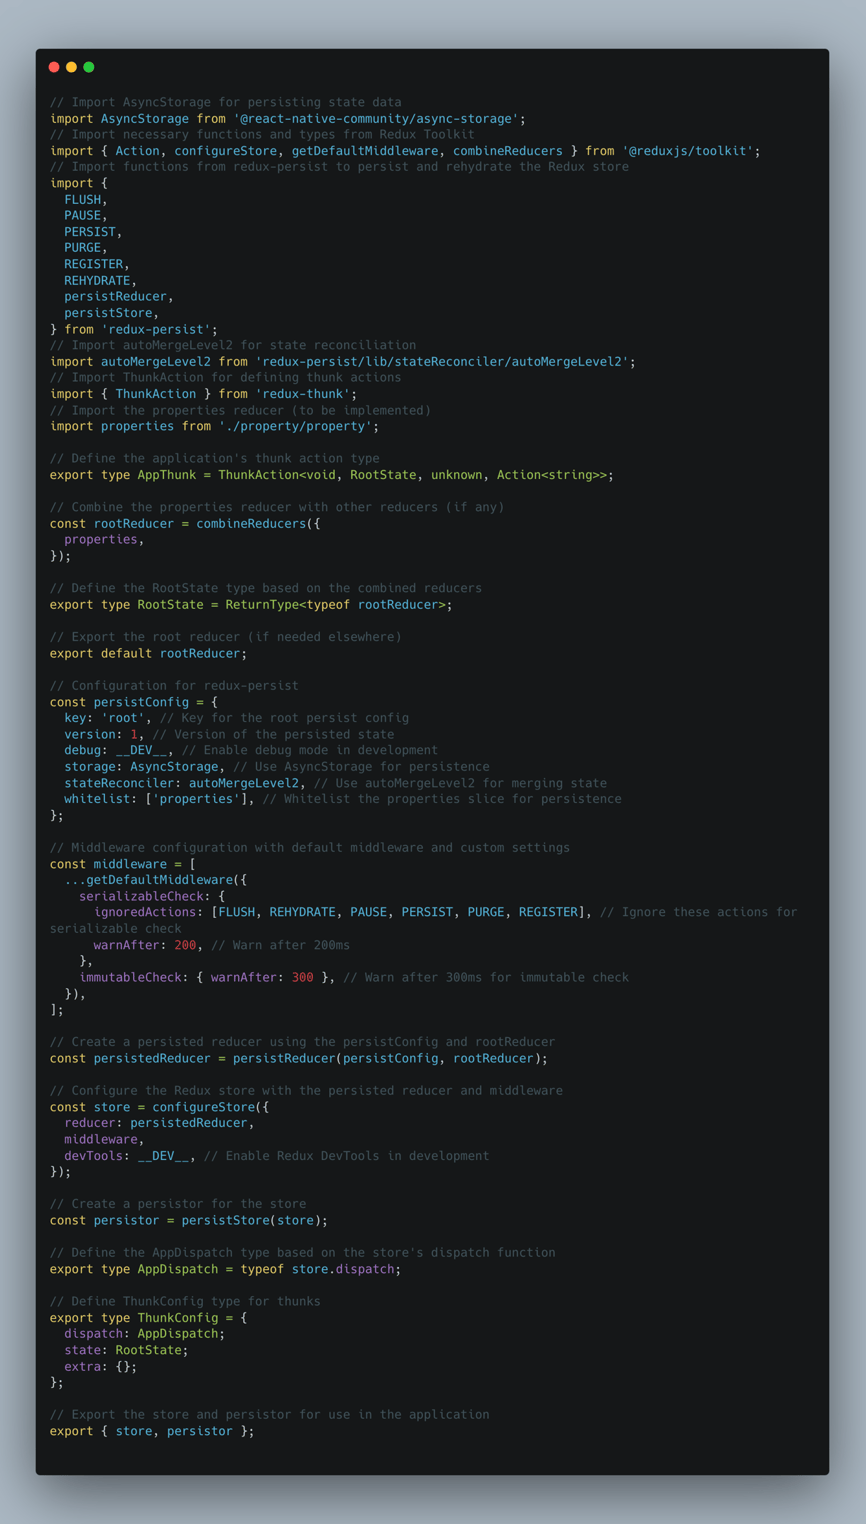
The store Implementation:
First: implement the store logic
Implement the store using create the redux folder, and put a store.ts file, having the following:
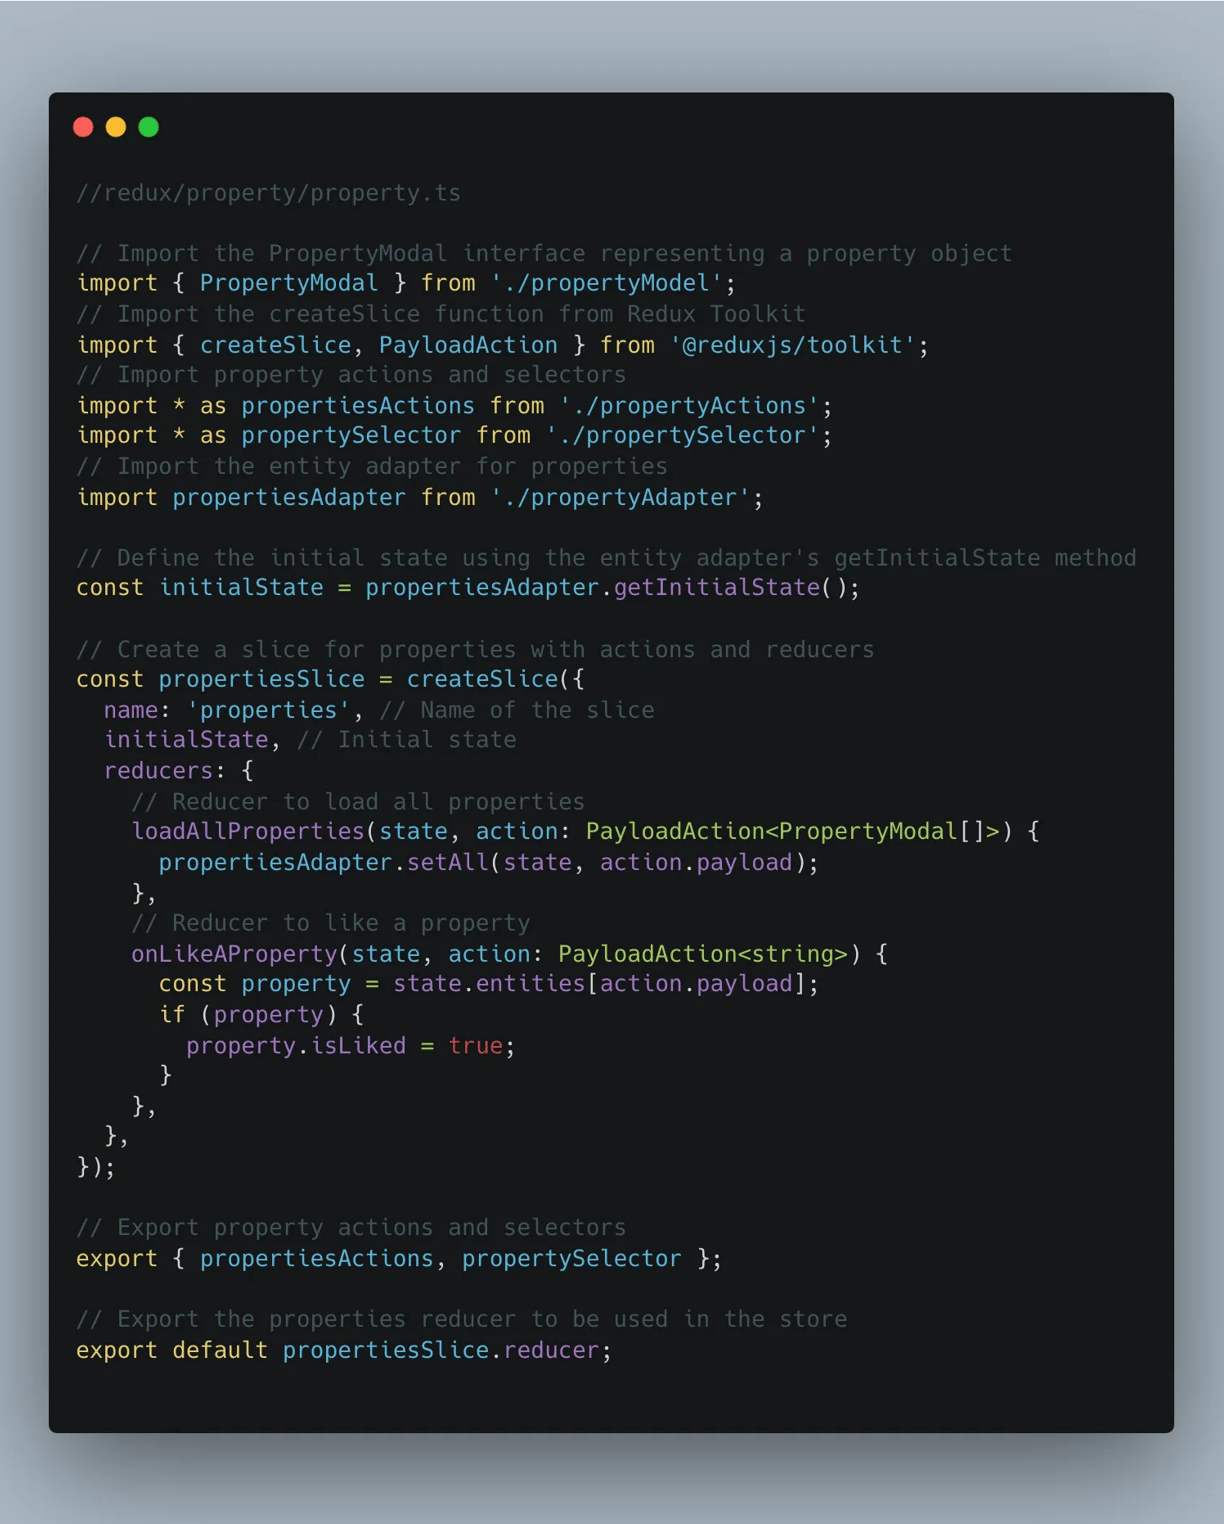
Second: implement the Redux
create the folder property inside redux folder.
we start by defining the model
// redux/property/propertyModal.ts
export interface Property {
id: string;
title: string;
createdAt:Date;
image_source:string;
isLiked:boolean;
// Add other property details here
}
3. create the propertyAction.ts, which is integrated with api calls.
//redux/property/propertyActions.ts
import { createAsyncThunk } from '@reduxjs/toolkit';
import propertyApi from '~/api/propertyApi/propertyApi';
import { Block } from '~/api/types';
import { RootState } from '../rootReducer';
// we used a defined Logger for our app
import {Logger} from '~/utils';
//Load all properties
export const loadAllProperties = createAsyncThunk<
GetAllPropertiesResponse,
undefined,
{ state: RootState }
>(
'property/loadAllProperties',
async () => {
try {
const response = await propertyApi.loadAllProperties();
return response.data;
} catch (error) {
Logger.trace('loadAllProperties: Error occurred');
Logger.recordError(error as Error);
}
},
);
export const onLikeAProperty = createAsyncThunk(
'property/onLikeAProperty',
async (id: Property['id']) => {
try {
const response = await propertyApi.likeAPropety(id);
return response.data;
} catch (error) {
Logger.trace('onLikeAProperty: Error occurred');
Logger.recordError(error as Error);
}
return payload;
},
);
4. After that, we create our Entity adapter to handle the data
//redux/property/propertyAdapter.ts
import { createEntityAdapter } from '@reduxjs/toolkit';
import {Property} from './propertyModel'
export const propertiesAdapter: EntityAdapter<Property> = createEntityAdapter({
selectId: (property: Property) => property.id,
// we show property by createdAt
sortComparer: (a, b) =>
new Date(a.createdAt).getTime() - new Date(b.createdAt).getTime(),
});
5. after that we define our selector
////redux/property/propertySelector.ts
import {Property} from './propertyModel'
import { RootState } from '../store';
import propertyAdapter from './propertyAdapter';
const propertySelectors = propertyAdapter.getSelectors<RootState>(
(state) => state.properties
)
// And then use the selectors to retrieve values
export const selectAllProperties = propertySelectors.selectAll
export const selectPropertyById =
(propertyId: Property['id']) => (state: RootState) =>
propertySelectors.selectById(state, propertyId);
and now, we finish by adding the all of that to our property slice


App imlementation
On this way, we already fixed our state redux. to use it, we need first to include the React native redux store provider into our app.
// App.tsx
import React from 'react';
import { Provider } from 'react-redux';
import store from './redux';
import PropertiesScreen from './screens/PropertiesScreen';
const App = () => (
<Provider store={store}>
<PropertiesScreen />
</Provider>
);
export default App;
and now we need to include all of this into the properties screen.
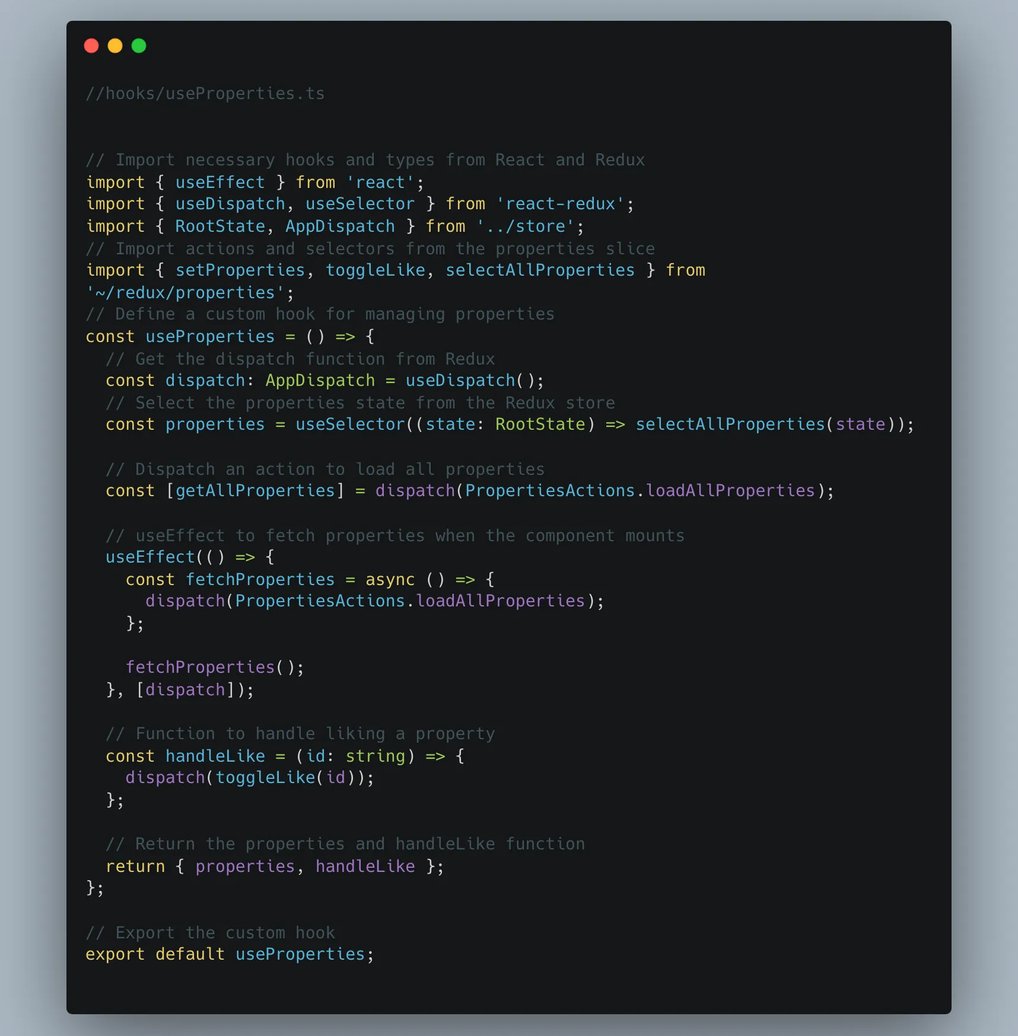
Create you Redux hook
the best way to do it, is to exctract the hook responsible for getting data, and for liking first, and include it:


Conclusion
In this comprehensive guide, we’ve explored the power of Redux Toolkit and its role in crafting well-structured and scalable React Native applications. You’ve learned:
The fundamentals of Redux Toolkit, its benefits, and how it simplifies Redux development.
A step-by-step approach to setting up Redux Toolkit in your app.
The Facade Design Pattern and its value in separating data fetching logic from your components.
How to implement Redux slices, actions, entity adapters, and selectors for efficient state management.
Strategies for building an offline-capable app, including API call caching.
The creation of a custom hook to streamline Redux integration with your components, leading to better app structure and maintainability.
By effectively utilizing Redux Toolkit’s capabilities, you’ve equipped yourself to build React Native applications that are well-organized, easier to maintain, and can handle complexities with greater ease. As your app grows, Redux Toolkit can provide a solid foundation to ensure its continued scalability and performance.
We have more tutorials and articles in our blog.
More blog article here:
